Macro to reconstruct spherical surface using SOLIDWORKS modeler API
This example demonstrates how to create spherical surface (360 degress) from the selected spherical face (could be less than 360 degrees) using SOLIDWORKS API.
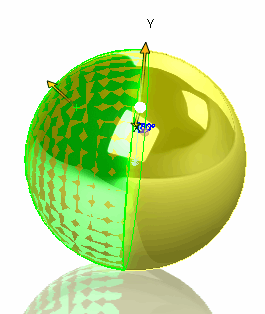
- Select any spherical surface and run the macro
- Reconstructed spherical surface is created as temp body and displayed in the graphics area
- Clear the selection to clear the preview
Spherical surface is created using the IModeler::CreateSphericalSurface2 SOLIDWORKS API method which is trimmed using the ISurface::CreateTrimmedSheet4
using SolidWorks.Interop.sldworks;
using SolidWorks.Interop.swconst;
using System.Runtime.InteropServices;
using System;

namespace CodeStackExample
{
    public partial class SolidWorksMacro
    {
        private IBody2 m_PreviewBody;

        public void Main()
        {
            PartDoc part = swApp.ActiveDoc as PartDoc;

            if (part != null)
            {
                IFace2 face = (part as IModelDoc2).ISelectionManager.GetSelectedObject6(1, -1) as IFace2;

                if (face != null && face.IGetSurface().IsSphere())
                {
                    double[] sphereParams = face.IGetSurface().SphereParams as double[];

                    IModeler modeler = swApp.IGetModeler();

                    ISurface sphereSurf = modeler.CreateSphericalSurface2(
                        new double[] { sphereParams[0], sphereParams[1], sphereParams[2] },
                        new double[] { 0, 0, 1 },
                        new double[] { 1, 0, 0 }, sphereParams[3]) as ISurface;

                    m_PreviewBody = sphereSurf.CreateTrimmedSheet4(new ICurve[] { null }, true) as IBody2;

                    m_PreviewBody.Display3(part, ToColorRef(255, 255, 0), (int)swTempBodySelectOptions_e.swTempBodySelectOptionNone);

                    part.ClearSelectionsNotify += new DPartDocEvents_ClearSelectionsNotifyEventHandler(OnClearSelections);
                }
                else
                {
                    swApp.SendMsgToUser("Please select spherical surface");
                }
            }
            else
            {
                swApp.SendMsgToUser("Please open part document");
            }
        }

        private int ToColorRef(byte r, byte g, byte b)
        {
            return (r << 0) | (g << 8) | (b << 16);
        }

        private int OnClearSelections()
        {
            m_PreviewBody = null;
            GC.Collect();
            return 0;
        }

        public SldWorks swApp;
    }
}